 |
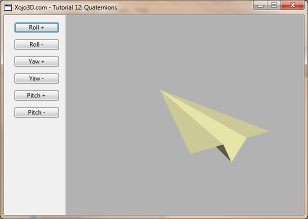
Tutorial 12: Quaternions Gimbal lock is a common problem when applying successive rotations to a model in Euclidean space. In this tutorial we add rotation capabilities to your models, by making use of quaternions. Quaternions provide an elegant solution to avoid Gimbal locks. |


 |
|
Quaternion X = Axis X × sin(θ / 2) Quaternion Y = Axis Y × sin(θ / 2) Quaternion Z = Axis Z × sin(θ / 2) Quaternion W = cos(θ / 2) |
|
Result W = Q1W × Q2W - Q1X × Q2X - Q1Y × Q2Y - Q1Z × Q2Z Result X = Q1W × Q2X + Q1X × Q2W + Q1Y × Q2Z - Q1Z × Q2Y Result Y = Q1W × Q2Y - Q1X × Q2Z + Q1Y × Q2W + Q1Z × Q2X Result Z = Q1W × Q2Z + Q1X × Q2Y - Q1Y × Q2X + Q1Z × Q2W |
 |
|
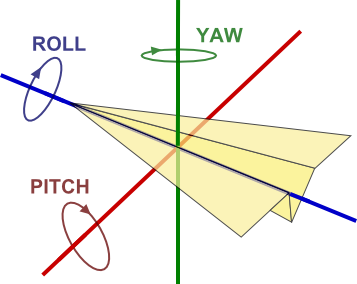
If Q is the quaternion we want to rotate, and P the quaternion created from axis (1, 0, 0) and angle θ, then: Pitch rotated Q = Q × P |
|
If Q is the quaternion we want to rotate, and Y the quaternion created from axis (0, 1, 0) and angle θ, then: Yaw rotated Q = Q × Y |
|
If Q is the quaternion we want to rotate, and R the quaternion created from axis (0, 0, 1) and angle θ, then: Roll rotated Q = Q × R |
| Control | Name | Left | Top | Caption | DoubleBuffer | Maximize Button |
| Window | SurfaceWindow | - | - | - | - | ON |
| OpenGLSurface | Surface | 123 | 0 | - | ON | - |
| Generic Button | RollPlusButton | 20 | 14 | Roll + | - | - |
| Generic Button | RollMinusButton | 20 | 48 | Roll - | - | - |
| Generic Button | YawPlusButton | 20 | 82 | Yaw + | - | - |
| Generic Button | YawMinusButton | 20 | 116 | Yaw - | - | - |
| Generic Button | PitchPlusButton | 20 | 150 | Pitch + | - | - |
| Generic Button | PitchMinusButton | 20 | 184 | Pitch - | - | - |
|
| Surface.Render |
|
X3_Initialize X3_EnableLight OpenGL.GL_LIGHT0, new X3Core.X3Light(0, 0, 1) |
| X3_SetPerspective Surface |
| Name | Value | Type |
| X3_180OverPi | 57.295779513082321 | Number |
| X3_PiOver180 | 0.017453292519943 | Number |
| Name | Type |
| X | Double |
| Y | Double |
| Z | Double |
| W | Double |
|
Sub Constructor() W = 1 X = 0 Y = 0 Z = 0 End Sub |
|
Sub Constructor(initW As Double, initX As Double, initY As Double, initZ As Double) W = initW X = initX Y = initY Z = initZ End Sub |
|
Sub Normalize() Dim m As Double m = Sqrt(x^2 + y^2 + z^2 + w^2) if m > 0 then w = w / m x = x / m y = y / m z = z / m end if End Sub |
|
Sub Multiply(q As X3Quaternion) Dim resultX As Double Dim resultY As Double Dim resultZ As Double Dim resultW As Double resultW = (w * q.w) - (x * q.x) - (y * q.y) - (z * q.z) resultX = (w * q.x) + (x * q.w) + (y * q.z) - (z * q.y) resultY = (w * q.y) - (x * q.z) +(y * q.w) + (z * q.x) resultZ = (w * q.z) +(x * q.y) - (y * q.x) +(z * q.w) x = resultX y = resultY z = resultZ w = resultW End Sub |
|
Sub FromEulerRotation(x As Double, y As Double, z As Double, angle As Double) Dim halfAngle As Double Dim sinAng As Double halfAngle = (angle * X3_PiOver180) / 2 sinAng = sin(halfAngle) Me.X = (x * sinAng) Me.Y = (y * sinAng) Me.Z = (z * sinAng) Me.W = cos(halfAngle) End Sub |
|
Sub Pitch(angle As Double) Dim tmpQuat As new X3Quaternion tmpQuat.FromEulerRotation(1, 0, 0, angle) Multiply tmpQuat Normalize End Sub |
|
Sub Yaw(angle As Double) Dim tmpQuat As new X3Quaternion tmpQuat.FromEulerRotation(0, 1, 0, angle) Multiply tmpQuat Normalize End Sub |
|
Sub Roll(angle As Double) Dim tmpQuat As new X3Quaternion tmpQuat.FromEulerRotation(0, 0, 1, angle) Multiply tmpQuat Normalize End Sub |
|
Sub Normalize() Dim m As Double m = Sqrt(x^2 + y^2 + z^2) if m > 0 then x = x / m y = y / m z = z / m end if End Sub |
| Name | Type |
| Rotation | X3Quaternion |
|
Sub Constructor() Rotation = new X3Quaternion() End Sub |
|
Sub X3_SetRotation(rotation As X3Quaternion) Dim angle As Double Dim axis As new X3Vector(rotation.x, rotation.y, rotation.z) axis.Normalize angle = ACos(rotation.w) * 2 * X3_180OverPi OpenGL.glRotated angle, axis.x, axis.y, axis.z End Sub |
|
Sub X3_RotateWithXY(q As X3Quaternion, xAngle As Double, yAngle As Double) Dim result As new X3Quaternion Dim tmpQuat As new X3Quaternion if xAngle <> 0 then tmpQuat.FromEulerRotation(1, 0, 0, xAngle) result.Multiply(tmpQuat) end if if yAngle <> 0 then tmpQuat.FromEulerRotation(0, 1, 0, yAngle) result.Multiply(tmpQuat) end if result.Multiply(q) result.Normalize q.W = result.W q.X = result.X q.Y = result.Y q.Z = result.Z End Sub |
|
Sub CalculateNormal() Dim v1X As Double Dim v1Y As Double Dim v1Z As Double Dim v2X As Double Dim v2Y As Double Dim v2Z As Double Dim cpX As Double Dim cpY As Double Dim cpZ As Double Dim m As Double v1X = Vertex(1).X - Vertex(0).X v1Y = Vertex(1).Y - Vertex(0).Y v1Z = Vertex(1).Z - Vertex(0).Z v2X = Vertex(2).X - Vertex(1).X v2Y = Vertex(2).Y - Vertex(1).Y v2Z = Vertex(2).Z - Vertex(1).Z cpX = v1Y * v2Z - v1Z * v2Y cpY = v1Z * v2X - v1X * v2Z cpZ = v1X * v2Y - v1Y * v2X m = Sqrt(cpX^2 + cpY^2 + cpZ^2) Normal.X = cpX / m Normal.Y = cpY / m Normal.Z = cpZ / m End Sub |
| Name | Type |
| Model | X3Core.X3Model |
| MousePrevX | Integer |
| MousePrevY | Integer |
|
Self.MouseCursor = System.Cursors.StandardPointer Model = X3Test_Paperplane() Model.Rotation.Pitch(20) |
|
OpenGL.glClearColor(1, 1, 1, 1) OpenGL.glClear(OpenGL.GL_COLOR_BUFFER_BIT + OpenGL.GL_DEPTH_BUFFER_BIT) OpenGL.glPushMatrix OpenGL.glTranslatef 0, 0, -5 X3_RenderModel Model OpenGL.glPopMatrix |
|
MousePrevX = x MousePrevY = y return true |
|
X3_RotateWithXY Model.Rotation, (y - MousePrevY), (x - MousePrevX) Surface.Render MousePrevX = x MousePrevY = y |
|
' add the following two lines directly after the variable declarations ' just before OpenGL.glBegin OpenGL.GL_TRIANGLES OpenGL.glPushMatrix X3_SetRotation(model.Rotation) ' add the following line to the end of the method ' just after OpenGL.glEnd OpenGL.glPopMatrix |
|
Model.Rotation.Roll(10) Surface.Render |
|
Model.Rotation.Roll(-10) Surface.Render |
|
Model.Rotation.Yaw(10) Surface.Render |
|
Model.Rotation.Yaw(-10) Surface.Render |
|
Model.Rotation.Yaw(-10) Surface.Render |
|
Model.Rotation.Pitch(10) Surface.Render |
|
Model.Rotation.Pitch(-10) Surface.Render |
|
Sub Normalize() Dim m As Double m = Sqrt(x^2 + y^2 + z^2 + w^2) if m > 0 then w = w / m x = x / m y = y / m z = z / m end if End Sub |
| To create a unit quaternion (a quaternion with a length of 1), you need to normalize the quaternion. The Normalize() method does this by dividing each component of the quaternion with the magnitude of the quaternion. |
|
Sub Multiply(q As X3Quaternion) Dim resultX As Double Dim resultY As Double Dim resultZ As Double Dim resultW As Double resultW = (w * q.w) - (x * q.x) - (y * q.y) - (z * q.z) resultX = (w * q.x) + (x * q.w) + (y * q.z) - (z * q.y) resultY = (w * q.y) - (x * q.z) +(y * q.w) + (z * q.x) resultZ = (w * q.z) +(x * q.y) - (y * q.x) +(z * q.w) x = resultX y = resultY z = resultZ w = resultW End Sub |
|
Quaternion multiplication is invaluable when it comes to applying successive rotations to a model. The explanation of the mathematics used to multiply two quaternions is beyond the scope of this tutorial, but it is important to note that quaternion multiplication is non-commutative. This means that if Q and R are two quaternions, then Q×R will yield a different answer than R×Q. The order in which you multiply quaternions is, therefore, very important. |
|
Sub FromEulerRotation(x As Double, y As Double, z As Double, angle As Double) Dim halfAngle As Double Dim sinAng As Double halfAngle = (angle * X3_PiOver180) / 2 sinAng = sin(halfAngle) Me.X = (x * sinAng) Me.Y = (y * sinAng) Me.Z = (z * sinAng) Me.W = cos(halfAngle) End Sub |
| FromEulerRotation is a helper method that is used to transform a Eulaer axis-angle pair into a four-dimensional quaternion. Note that the angle is given in degrees. The explanation of the mathematics used to transform a Euler axis-angle pair into a quaternion is beyond the scope of this tutorial. |
|
Sub Pitch(angle As Double) Dim tmpQuat As new X3Quaternion tmpQuat.FromEulerRotation(1, 0, 0, angle) Multiply tmpQuat Normalize End Sub |
| The Pitch method, of the X3Quaternion class, applies a pitch rotation to an existing quaternion. First, we create a new pitch rotation quaternion, from the unit x-axis and a rotation applied around this axis. Then, we simply multiply the new rotation quaternion with the existing quaternion. Finally, we normalize the result to ensure that we end up with a unit quaternion. |
|
Sub Yaw(angle As Double) Dim tmpQuat As new X3Quaternion tmpQuat.FromEulerRotation(0, 1, 0, angle) Multiply tmpQuat Normalize End Sub |
| The Yaw method, of the X3Quaternion class, applies a yaw rotation to an existing quaternion. First, we create a new yaw rotation quaternion, from the unit y-axis and a rotation applied around this axis. Then, we simply multiply the new rotation quaternion with the existing quaternion. Finally, we normalize the result to ensure that we end up with a unit quaternion. |
|
Sub Roll(angle As Double) Dim tmpQuat As new X3Quaternion tmpQuat.FromEulerRotation(0, 1, 0, angle) Multiply tmpQuat Normalize End Sub |
| The Roll method, of the X3Quaternion class, applies a roll rotation to an existing quaternion. First, we create a new roll rotation quaternion, from the unit z-axis and a rotation applied around this axis. Then, we simply multiply the new rotation quaternion with the existing quaternion. Finally, we normalize the result to ensure that we end up with a unit quaternion. |
|
Sub Normalize() Dim m As Double m = Sqrt(x^2 + y^2 + z^2) if m > 0 then x = x / m y = y / m z = z / m end if End Sub |
| To create a unit vector (a vector with a length of 1), you need to normalize the vector. The Normalize() method does this by dividing each component of the vector with the magnitude of the vector. |
|
Sub X3_SetRotation(rotation As X3Quaternion) Dim angle As Double Dim axis As new X3Vector(rotation.x, rotation.y, rotation.z) axis.Normalize angle = ACos(rotation.w) * 2 * X3_180OverPi OpenGL.glRotated angle, axis.x, axis.y, axis.z End Sub |
| X3_SetRotation is a helper function, to apply the rotation defined by a quaternion, in the OpenGL environment. |
|
Sub X3_RotateWithXY(q As X3Quaternion, xAngle As Double, yAngle As Double) Dim result As new X3Quaternion Dim tmpQuat As new X3Quaternion if xAngle <> 0 then tmpQuat.FromEulerRotation(1, 0, 0, xAngle) result.Multiply(tmpQuat) end if if yAngle <> 0 then tmpQuat.FromEulerRotation(0, 1, 0, yAngle) result.Multiply(tmpQuat) end if result.Multiply(q) result.Normalize q.W = result.W q.X = result.X q.Y = result.Y q.Z = result.Z End Sub |
|
Sometimes you might need to rotate a model when you only have the X and Y values as input, e.g. in a 3D editor when the user uses the mouse cursor to rotate a model. X3_RotateWithXY is a helper function, to rotate a quaternion when you only have the X and Y values available. From the code you can see that we first apply a pitch rotation with the X value, and then a yaw rotation with the Y value. This effectively rotates the quaternion in 3D space, when only the X and Y values available. |
|
Sub CalculateNormal() Dim v1X As Double Dim v1Y As Double Dim v1Z As Double Dim v2X As Double Dim v2Y As Double Dim v2Z As Double Dim cpX As Double Dim cpY As Double Dim cpZ As Double Dim m As Double v1X = Vertex(1).X - Vertex(0).X v1Y = Vertex(1).Y - Vertex(0).Y v1Z = Vertex(1).Z - Vertex(0).Z v2X = Vertex(2).X - Vertex(1).X v2Y = Vertex(2).Y - Vertex(1).Y v2Z = Vertex(2).Z - Vertex(1).Z cpX = v1Y * v2Z - v1Z * v2Y cpY = v1Z * v2X - v1X * v2Z cpZ = v1X * v2Y - v1Y * v2X m = Sqrt(cpX^2 + cpY^2 + cpZ^2) Normal.X = cpX / m Normal.Y = cpY / m Normal.Z = cpZ / m End Sub |
|
When you instantiate a new polygon with vertices, the CalculateNormal can be used to calculate the normal of this polygon using the vertices. It can also be called when the vertex data change, to re-calculate the new normal. First, the two vectors that form two edges of the triangular polygon is determined, v1 and v2 respectively. Then, the cross product of these two vectors are calculated. The cross product is the vector that is perpendicular to the surface formed by v1 and v2, better known as the normal. Finally, we normalize the vector and store the results. |
|
|