 |
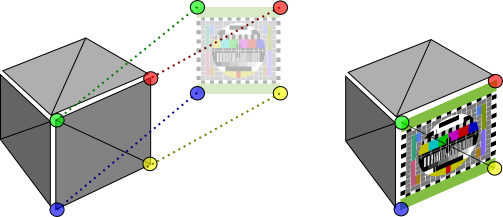
Tutorial 11: Texture mapping Mapping textures to polygons is a technique that gives 3D models a realistic look, by making use of 2D images. Learn the basics of texture mapping with this tutorial. |


 |
 |
 |
 |
| Control | Name | DoubleBuffer | Left | Top | Maximize Button |
| Window | SurfaceWindow | - | - | - | ON |
| OpenGLSurface | Surface | ON | 0 | 0 | - |
|
| Surface.Render |
|
X3_Initialize X3_EnableLight OpenGL.GL_LIGHT0, new X3Core.X3Light(0, 0, 1) |
| X3_SetPerspective Surface |
|
Function X3_LoadRGBATexture(RGBABitmap As MemoryBlock, width As Integer, height As Integer) As Integer // IMPORTANT: Image dimensions must be in power of 2 (e.g. 8x8, 16x16, 32x32, 64x64, ...) Dim idMB As MemoryBlock Dim oglName As Integer idMB = new MemoryBlock(4) OpenGL.glGenTextures(1, idMB) oglName = idMB.Long(0) OpenGL.glBindTexture(OpenGL.GL_TEXTURE_2D, OGLName) OpenGL.glTexParameteri(OpenGL.GL_TEXTURE_2D, OpenGL.GL_TEXTURE_MIN_FILTER, OpenGL.GL_LINEAR) OpenGL.glTexParameteri(OpenGL.GL_TEXTURE_2D, OpenGL.GL_TEXTURE_MAG_FILTER, OpenGL.GL_LINEAR) OpenGL.glTexImage2d(OpenGL.GL_TEXTURE_2D, 0, 4, width, height , 0, OpenGL.GL_RGBA, OpenGL.GL_UNSIGNED_BYTE, RGBABitmap) return oglName End Function |
| Name | Type |
| Height | Integer |
| Width | Integer |
| OGLName | Integer |
| RGBABitmap | MemoryBlock |
|
Sub Constructor(texture As Picture) Dim x, y, offset As Integer Dim textCol As Color Dim textMaskCol As Color Dim alpha As Byte Width = texture.Width Height = texture.Height RGBABitmap = new MemoryBlock(Height * Width * 4) offset = 0 for y = 0 to Height - 1 for x = 0 to Width - 1 textCol = texture.RGBSurface.Pixel(x,y) textMaskCol = texture.Mask.RGBSurface.Pixel(x, y) alpha = 255 - (textMaskCol.Red + textMaskCol.Green + textMaskCol.Blue) / 3 RGBABitmap.Byte(offset) = textCol.Red RGBABitmap.Byte(offset + 1) = textCol.Green RGBABitmap.Byte(offset + 2) = textCol.Blue RGBABitmap.Byte(offset + 3) = alpha offset = offset + 4 next x next y OGLName = X3_LoadRGBATexture(RGBABitmap, Width, Height) End Sub |
|
Sub Destructor() Dim texturePtr As MemoryBlock OpenGL.glFlush texturePtr = new MemoryBlock(4) texturePtr.Long(0) = OGLName OpenGL.glDeleteTextures(1, texturePtr) End Sub |
| Name | Type |
| U | Double |
| V | Double |
|
Sub Constructor(initU As Double, initV As Double) U = initU V = initV End Sub |
| Name | Type |
| Texture | X3Texture |
| UVMap() | X3UVCoordinate |
|
Dim i, j As Integer Dim poly As X3Core.X3Polygon OpenGL.glBegin OpenGL.GL_TRIANGLES for i = 0 to model.Polygon.Ubound poly = model.Polygon(i) OpenGL.glNormal3d poly.Normal.X, poly.Normal.Y, poly.Normal.Z if (poly.Texture <> nil) and (poly.UVMap.Ubound >= poly.Vertex.Ubound) then OpenGL.glColor4d(1, 1, 1, 1) OpenGL.glBindTexture(OpenGL.GL_TEXTURE_2D, poly.Texture.OGLName) for j = 0 to poly.Vertex.Ubound OpenGL.glTexCoord2d poly.UVMap(j).U, poly.UVMap(j).V OpenGL.glVertex3d poly.Vertex(j).X, poly.Vertex(j).Y, poly.Vertex(j).Z next j OpenGL.glBindTexture(OpenGL.GL_TEXTURE_2D, 0) else if poly.FillColor <> nil then OpenGL.glColor4d(poly.FillColor.Red, poly.FillColor.Green, poly.FillColor.Blue, poly.FillColor.Alpha) else OpenGL.glColor4d(1, 1, 1, 1) end if for j = 0 to poly.Vertex.Ubound OpenGL.glVertex3d poly.Vertex(j).X, poly.Vertex(j).Y, poly.Vertex(j).Z next j end if next i OpenGL.glEnd |
| Name | Type |
| Model | X3Core.X3Model |
|
Self.MouseCursor = System.Cursors.StandardPointer Model = X3Test_Cube4(imgTexture) |
| OpenGL.glEnable OpenGL.GL_TEXTURE_2D |
|
OpenGL.glClearColor(0, 0, 0, 1) OpenGL.glClear(OpenGL.GL_COLOR_BUFFER_BIT + OpenGL.GL_DEPTH_BUFFER_BIT) OpenGL.glPushMatrix OpenGL.glTranslatef 0, 0, -4.0 OpenGL.glRotated(30, 1, 0, 0) OpenGL.glRotated(30, 0, 1, 0) X3_RenderModel Model OpenGL.glPopMatrix |
|
Sub Constructor(texture As Picture) Dim x, y, offset As Integer Dim textCol As Color Dim textMaskCol As Color Dim alpha As Byte Width = texture.Width Height = texture.Height RGBABitmap = new MemoryBlock(Height * Width * 4) offset = 0 for y = 0 to Height - 1 for x = 0 to Width - 1 textCol = texture.RGBSurface.Pixel(x,y) textMaskCol = texture.Mask.RGBSurface.Pixel(x, y) alpha = 255 - (textMaskCol.Red + textMaskCol.Green + textMaskCol.Blue) / 3 RGBABitmap.Byte(offset) = textCol.Red RGBABitmap.Byte(offset + 1) = textCol.Green RGBABitmap.Byte(offset + 2) = textCol.Blue RGBABitmap.Byte(offset + 3) = alpha offset = offset + 4 next x next y OGLName = X3_LoadRGBATexture(RGBABitmap, Width, Height) End Sub |
| The constructor of the X3Texture class takes a normal Picture object as a parameter. First the Width and Height properties of the X3Texture is initialized with the Width and Height properties of the picture object. The picture object is then transformed by the constructor into a MemoryBlock that is stored in the RGBABitmap property. Finally the texture bitmap is loaded into memory with the X3_LoadRGBATexture helper method. |
|
Sub Destructor() Dim texturePtr As MemoryBlock OpenGL.glFlush texturePtr = new MemoryBlock(4) texturePtr.Long(0) = OGLName OpenGL.glDeleteTextures(1, texturePtr) End Sub |
| The destructure of the X3Texture class is called when the X3Texture object is destroyed. The texture is linked to a bitmap loaded into OpenGL memory, we unload this bitmap in the destructure of X3Texture. The unloading is done by using the glDeleteTextures function together with the OGLName assigned to the bitmap. |
|
Sub Constructor(initU As Double, initV As Double) U = initU V = initV End Sub |
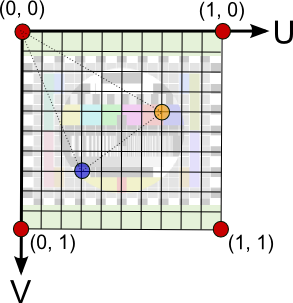
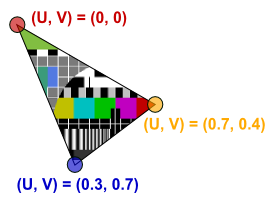
| The X3UVCoordinate object stores a single UV-coordinate, and when used in an array together with other X3UVCoordinate instances, forms an UV-map that maps a texture to a polygon. The constructor method makes it easy to instantiate a new coordinate with predefined values. We simply set the U and V properties of the coordinate equal to the given values. |
| OpenGL.glEnable OpenGL.GL_TEXTURE_2D |
| The new instruction added to the end of the X3_Initialize method, enables OpenGL's texture mapping feature. We can now bind to textures during rendering, and map these textures onto polygons. |
|
Dim i, j As Integer Dim poly As X3Core.X3Polygon OpenGL.glBegin OpenGL.GL_TRIANGLES for i = 0 to model.Polygon.Ubound poly = model.Polygon(i) OpenGL.glNormal3d poly.Normal.X, poly.Normal.Y, poly.Normal.Z if (poly.Texture <> nil) and (poly.UVMap.Ubound >= poly.Vertex.Ubound) then OpenGL.glColor4d(1, 1, 1, 1) OpenGL.glBindTexture(OpenGL.GL_TEXTURE_2D, poly.Texture.OGLName) for j = 0 to poly.Vertex.Ubound OpenGL.glTexCoord2d poly.UVMap(j).U, poly.UVMap(j).V OpenGL.glVertex3d poly.Vertex(j).X, poly.Vertex(j).Y, poly.Vertex(j).Z next j OpenGL.glBindTexture(OpenGL.GL_TEXTURE_2D, 0) else if poly.FillColor <> nil then OpenGL.glColor4d(poly.FillColor.Red, poly.FillColor.Green, poly.FillColor.Blue, poly.FillColor.Alpha) else OpenGL.glColor4d(1, 1, 1, 1) end if for j = 0 to poly.Vertex.Ubound OpenGL.glVertex3d poly.Vertex(j).X, poly.Vertex(j).Y, poly.Vertex(j).Z next j end if next i OpenGL.glEnd |
|
The new rendering routine distinguishes between two types of polygons, polygons that have a texture object assigned to them, and polygons without textures (only color). When a polygon has a texture assigned to it, we bind to this texture using the glBindTexture function. The glTexCoord2d function is called with the UV-coordinates for each vertex, just before sending the vertex coordinates to OpenGL. Once we've completed the drawing of the vertices, we "unbind" from the texture using the glBindTexture function with a parameter value of 0. |
|
|