 |
Tutorial 7: OpenGL depth buffer The OpenGL depth buffer prevents polygons at the back from being drawn over polygons in the front. Learn in this tutorial how to use the OpenGL depth buffer. |


 |
| Control | Name | DoubleBuffer | Left | Top | Maximize Button |
| Window | SurfaceWindow | - | - | - | ON |
| OpenGLSurface | Surface | ON | 0 | 0 | - |
|
| Self.MouseCursor = System.Cursors.StandardPointer |
| Surface.Render |
| X3_SetPerspective Surface |
|
OpenGL.glEnable OpenGL.GL_DEPTH_TEST OpenGL.glDepthMask OpenGL.GL_TRUE OpenGL.glCullFace OpenGL.GL_BACK OpenGL.glEnable OpenGL.GL_CULL_FACE |
| X3_Initialize |
|
Dim i, j As Integer Dim polygon() As X3Core.X3Polygon Dim poly As X3Core.X3Polygon poly = new X3Core.X3Polygon() poly.FillColor = new X3Core.X3Color(1, 1, 0) poly.Vertex.Append new X3Core.X3Vector(-1.2, 0.8, 0) poly.Vertex.Append new X3Core.X3Vector(-1.2, -1.2, 0) poly.Vertex.Append new X3Core.X3Vector(0.8, -1.2, 0) polygon.Append poly poly = new X3Core.X3Polygon() poly.FillColor = new X3Core.X3Color(1, 0, -1) poly.Vertex.Append new X3Core.X3Vector(-1, 1, -1) poly.Vertex.Append new X3Core.X3Vector(1, -1, -1) poly.Vertex.Append new X3Core.X3Vector(1, 1, -1) polygon.Append poly poly = new X3Core.X3Polygon() poly.FillColor = new X3Core.X3Color(1, 0, -1) poly.Vertex.Append new X3Core.X3Vector(-1, 1, -1) poly.Vertex.Append new X3Core.X3Vector(-1, -1, -1) poly.Vertex.Append new X3Core.X3Vector(1, -1, -1) polygon.Append poly OpenGL.glPushMatrix OpenGL.glClearColor(0, 0, 0, 1) OpenGL.glClear(OpenGL.GL_COLOR_BUFFER_BIT + OpenGL.GL_DEPTH_BUFFER_BIT) OpenGL.glTranslatef 0.0, 0.0, -3.0 OpenGL.glBegin OpenGL.GL_TRIANGLES for i = 0 to polygon.Ubound poly = polygon(i) if poly.FillColor <> nil then OpenGL.glColor3d(poly.FillColor.Red, poly.FillColor.Green, poly.FillColor.Blue) else OpenGL.glColor3d(1, 1, 1) end if for j = 0 to poly.Vertex.Ubound OpenGL.glVertex3d poly.Vertex(j).X, poly.Vertex(j).Y, poly.Vertex(j).Z next j next i OpenGL.glEnd OpenGL.glPopMatrix |
|
OpenGL.glEnable OpenGL.GL_DEPTH_TEST OpenGL.glDepthMask OpenGL.GL_TRUE OpenGL.glCullFace OpenGL.GL_BACK OpenGL.glEnable OpenGL.GL_CULL_FACE |
| In the initialization routine, we enable OpenGL depth testing with the first instruction. The glDepthMask call enables writing into the depth buffer. The last two lines enable back-face culling like explained in the previous tutorial. |
|
Dim i, j As Integer Dim polygon() As X3Core.X3Polygon Dim poly As X3Core.X3Polygon poly = new X3Core.X3Polygon() poly.FillColor = new X3Core.X3Color(1, 1, 0) poly.Vertex.Append new X3Core.X3Vector(-1.2, 0.8, 0) poly.Vertex.Append new X3Core.X3Vector(-1.2, -1.2, 0) poly.Vertex.Append new X3Core.X3Vector(0.8, -1.2, 0) polygon.Append poly poly = new X3Core.X3Polygon() poly.FillColor = new X3Core.X3Color(1, 0, -1) poly.Vertex.Append new X3Core.X3Vector(-1, 1, -1) poly.Vertex.Append new X3Core.X3Vector(1, -1, -1) poly.Vertex.Append new X3Core.X3Vector(1, 1, -1) polygon.Append poly poly = new X3Core.X3Polygon() poly.FillColor = new X3Core.X3Color(1, 0, -1) poly.Vertex.Append new X3Core.X3Vector(-1, 1, -1) poly.Vertex.Append new X3Core.X3Vector(-1, -1, -1) poly.Vertex.Append new X3Core.X3Vector(1, -1, -1) polygon.Append poly OpenGL.glPushMatrix OpenGL.glClearColor(0, 0, 0, 1) OpenGL.glClear(OpenGL.GL_COLOR_BUFFER_BIT + OpenGL.GL_DEPTH_BUFFER_BIT) OpenGL.glTranslatef 0.0, 0.0, -3.0 OpenGL.glBegin OpenGL.GL_TRIANGLES for i = 0 to polygon.Ubound poly = polygon(i) if poly.FillColor <> nil then OpenGL.glColor3d(poly.FillColor.Red, poly.FillColor.Green, poly.FillColor.Blue) else OpenGL.glColor3d(1, 1, 1) end if for j = 0 to poly.Vertex.Ubound OpenGL.glVertex3d poly.Vertex(j).X, poly.Vertex(j).Y, poly.Vertex(j).Z next j next i OpenGL.glEnd OpenGL.glPopMatrix |
|
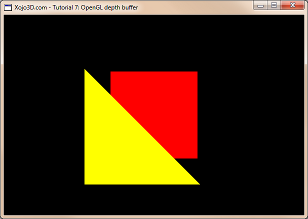
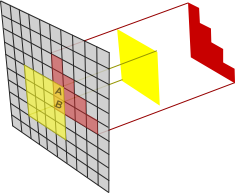
When you study the rendering code, you will notice that we have two shapes made from three polygons. A yellow triangle closer to us and a red square in the distance. It is important to note that we need to pass the GL_DEPTH_BUFFER_BIT constant to the glClear function, to clear the depth buffer before we start rendering our scene. The important lesson to take from this code is that, even though we draw the red square after the yellow triangle, the red surface does not cover any part of the yellow surface, because the square is actually behind the triangle. You can test the effect that depth testing has on rendering, by commenting out the first two lines in the X3_Initialize method. See how the red surface now covers the yellow surface. |
|
|

