 |
Tutorial 6: Back-face culling Back-face culling is a technique used to be more resourceful with your available processing power. In this tutorial you will learn how to activate back-face culling in OpenGL. |


 |
 |
|
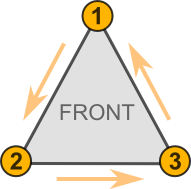
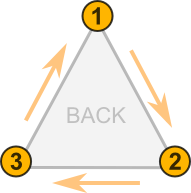
| Front View | Back View |
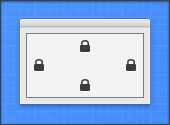
| Control | Name | DoubleBuffer | Left | Top | Maximize Button |
| Window | SurfaceWindow | - | - | - | ON |
| OpenGLSurface | Surface | ON | 0 | 0 | - |
|
| Self.MouseCursor = System.Cursors.StandardPointer |
| Surface.Render |
| X3_SetPerspective Surface |
|
Sub X3_Initialize() OpenGL.glCullFace OpenGL.GL_BACK OpenGL.glEnable OpenGL.GL_CULL_FACE End Sub |
| X3_Initialize |
|
Dim i, j As Integer Dim polygon() As X3Core.X3Polygon Dim poly As X3Core.X3Polygon poly = new X3Core.X3Polygon() poly.FillColor = new X3Core.X3Color(0, 1, 0) poly.Vertex.Append new X3Core.X3Vector(-1, 1, 0) poly.Vertex.Append new X3Core.X3Vector(1, -1, 0) poly.Vertex.Append new X3Core.X3Vector(1, 1, 0) polygon.Append poly poly = new X3Core.X3Polygon() poly.FillColor = new X3Core.X3Color(1, 0, 0) poly.Vertex.Append new X3Core.X3Vector(-1, 1, 0) poly.Vertex.Append new X3Core.X3Vector(1, -1, 0) poly.Vertex.Append new X3Core.X3Vector(-1, -1, 0) polygon.Append poly OpenGL.glPushMatrix OpenGL.glClearColor(0, 0, 0, 1) OpenGL.glClear(OpenGL.GL_COLOR_BUFFER_BIT) OpenGL.glTranslatef 0.0, 0.0, -3.0 OpenGL.glBegin OpenGL.GL_TRIANGLES for i = 0 to polygon.Ubound poly = polygon(i) if poly.FillColor <> nil then OpenGL.glColor3d(poly.FillColor.Red, poly.FillColor.Green, poly.FillColor.Blue) else OpenGL.glColor3d(1, 1, 1) end if for j = 0 to poly.Vertex.Ubound OpenGL.glVertex3d poly.Vertex(j).X, poly.Vertex(j).Y, poly.Vertex(j).Z next j next i OpenGL.glEnd OpenGL.glPopMatrix |
|
Sub X3_Initialize() OpenGL.glCullFace OpenGL.GL_BACK OpenGL.glEnable OpenGL.GL_CULL_FACE End Sub |
|
Enabling back-face culling is common to almost every OpenGL application, so we've created an initialization method that can be used in any OpenGL project. First we set the culling mode to back-facing polygons with a call to glCullFace. We then enable face culling with a call to glEnable, passing the GL_CULL_FACE constant as a parameter. All polygons facing away from us will now be ignored by the OpenGL rendering routines. |
| X3_Initialize |
| A call to X3_Initialize, in the Open event handler of the OpenGL surface, enables back-face culling. |
|
Dim i, j As Integer Dim polygon() As X3Core.X3Polygon Dim poly As X3Core.X3Polygon poly = new X3Core.X3Polygon() poly.FillColor = new X3Core.X3Color(0, 1, 0) poly.Vertex.Append new X3Core.X3Vector(-1, 1, 0) poly.Vertex.Append new X3Core.X3Vector(1, -1, 0) poly.Vertex.Append new X3Core.X3Vector(1, 1, 0) polygon.Append poly poly = new X3Core.X3Polygon() poly.FillColor = new X3Core.X3Color(1, 0, 0) poly.Vertex.Append new X3Core.X3Vector(-1, 1, 0) poly.Vertex.Append new X3Core.X3Vector(1, -1, 0) poly.Vertex.Append new X3Core.X3Vector(-1, -1, 0) polygon.Append poly OpenGL.glPushMatrix OpenGL.glClearColor(0, 0, 0, 1) OpenGL.glClear(OpenGL.GL_COLOR_BUFFER_BIT) OpenGL.glTranslatef 0.0, 0.0, -3.0 OpenGL.glBegin OpenGL.GL_TRIANGLES for i = 0 to polygon.Ubound poly = polygon(i) if poly.FillColor <> nil then OpenGL.glColor3d(poly.FillColor.Red, poly.FillColor.Green, poly.FillColor.Blue) else OpenGL.glColor3d(1, 1, 1) end if for j = 0 to poly.Vertex.Ubound OpenGL.glVertex3d poly.Vertex(j).X, poly.Vertex(j).Y, poly.Vertex(j).Z next j next i OpenGL.glEnd OpenGL.glPopMatrix |
|
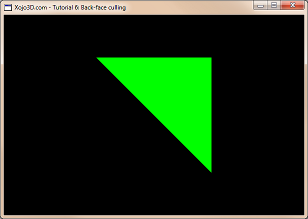
Notice how we defined two polygons in our rendering method, yet only one polygon is displayed when we run the program. This is because the second (red) polygon is facing away from us. Because we enabled back-face culling, the red polygon is ignored by OpenGL. To test the effect of back-face culling, comment out the X3_Initialize call in Surface.Open and run the program again. You will now see both polygons. IMPORTANT: The vertices of a polygon is always defined in an counter-clockwise order, so that OpenGL knows which way the polygon is facing. |
|
|

